Tips and troubleshooting for the connectors
The following tips, tricks and troubleshooting offer solutions to problems and situations that can arise when the Qlik Connectors are used in complex production environments. Most of solutions offered here derive from real situations encountered by customers. Many of the points made below are also covered in the online help for individual connectors. They are collected here for easy access when issues arise.
ODBC Connector Package
Apache Hive
Kerberos authentication is not supported in the Apache Hive Connector contained in the ODBC Connector Package.
Microsoft SQL Server
Connection failure
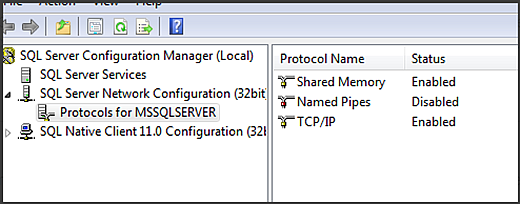
Failure to connect to a Microsoft SQL Server can be caused by TCP/IP setting in the server. The error message from the Microsoft SQL Server Connector indicates other properties, such as user name, password, host name might be incorrect. But the connection can fail even when those properties are correct. The properties can be verified by connecting through OLEDB or ODBC DNS. If those connections succeed, then the problem might be caused by the TCP/IP setting in the server.
To resolve the problem, enable the TCP/IP protocol in the SQL Server Configuration, as in the example:

Other things to consider:
- Ensure that the host name is discoverable on the network. Execute nslookup sift0035 in the command prompt. If the host can be discovered, nslookup will return a valid name and IP address for the server.
- If sift0035 is an SQLExpress instance, by default it may not listen on port 1433. Check the SQL Server settings to confirm the correct port. More information on SQLExpress can be found at http://razorsql.com/docs/support_sqlserver_express.html.
MongoDB
Connector does not return all fields
MongoDB is a NoSQL database that uses JSON-like documents with schemas. By default the MongoDB driver analyzes only some documents, extracts all found fields and creates a virtual table that is available in Qlik Sense. If a document is not analyzed and has some additional fields these will not be included in the virtual table.
You can control which and how many documents are analyzed by specifying the Name and Value of these Advanced options:
-
SamplingStrategy
The sampling method. You can sample records by setting the value to Forward (start from the first record), Backward (start from the last record), or Random.Information noteThe random sampling method is only supported by MongoDB Server 3.2 or higher. -
SamplingLimit
The maximum number of records that the driver can sample to generate the schema definition. To sample every record in the database, set the value to 0. Sampling a large number of records gives a more accurate schema definition, but it might result in longer sampling times. -
SamplingStepSize
The interval at which the driver samples a record when scanning through the data. If you set the value to 2, then the driver samples every second record in the data. When the SamplingStrategy is set to Random this option is ignored.
Snowflake Connector
An empty schema list is returned in the select dialog
Possible cause
The Database instance does not have a default Warehouse configured.
Proposed action
Verify that you have set the Warehouse parameter to the appropriate value.
Teradata
Add Query Bands to Teradata connection
Query Bands can be added to a Qlik Teradata connection. Query Bands and the SQL QUERY_BAND statement are explained in the Teradata Query Banding docs.
Essbase Connector
Version 1.1 not working with Oracle Hyperion server version 11.1.2.4
Proposed action Versions of the XMLA Provider for Hyperion Essbase and Essbase Server must match
The following document contains an illustration that shows how the QlikView Essbase Connector connects to an XMLA Provider for Hyperion Essbase that then connects to the Essbase Server.
Oracle Hyperion Provider Services Component Architecture
REST Connector
How to configure proxy settings
In an environment that requires all requests go through a forward proxy, the REST Connector requires additional configuration before connections can be made.
Add the following lines in QvRestConnector.exe.config file, which is located C:\Program Files\Common Files\Qlik\Custom Data\QvRestConnector:
- The proxy settings must be added between <configuration> and </configuration>.
-
172.16.16.102 represents the proxy server IP address and 8888 is the port to connect to the proxy server.
For other possible settings, see the default Proxy element settings.
The setting can also be set for all applications using .NET framework by modifying the file machine.config, located in C:\Windows\Microsoft.NET\Framework64\vX.X.XXXXX\Config. X.X.XXXX is the version number for the .NET framework installed.
This proxy configuration procedure can be used for other connectors included in Qlik Sense Enterprise for Windows hub: ODBC Connector Package and Salesforce Connector.
Salesforce Connector
Connector fails when run simultaneously in two QVWs
When the Salesforce Connector is used in two different QVWs, one of the QVWs fails to load when the two are run at the same time.
Salesforce allows only one connection at a time. Stagger the reloads so that they do not occur at the same time.
Resulting QVX file contains randomly shorted records
The QVX resulting from the connector shorts records randomly even if Ordered by clause has been added in the select string.
Possible cause
The default option for the connection configuration is to have the Plain query option turned on. Plain query provides better performance using parallelization for data loading and data conversion. This results in random order of the table rows.
Proposed action
Disable Plain query when configuring the connection. This might lead to impaired performance.
Connector in BULK mode consumes too many API calls
Possible cause
The Salesforce job or batch contains a large number of records, so the Salesforce Connector performs a large number of GET_BATCH_INFO and GET_JOB_STATUS calls while waiting for the job or batch to finish.
Proposed action
Change the value of the Status calls interval when configuring the connection.
SAP Connector
Error: illegal parameter value (function=SAP_CMACCPTP /parameter=handle /value=548
Proposed action
Add a line to the reg_info file (the locationof the reg_info file is specified by parameter gw/reg_info):
P TP=QTQVCEXTR1 HOST=<Servername>,<FQDN Servername> ACCESS=<SAP Servername>,FQSN SAP Servername>,internal CANCEL=internalError: Forbidden: License is not valid for SAP usage.
Proposed action
Make sure that your current license for the Qlik Sense SaaS allows you to use the SAP connectors.
Many background ARFCXXXX jobs visible in SM37
There are two cases when ARFC batch jobs are created:
- There is a connection failure and the scheduler automatically creates a batch job for such connection failures.
- Application explicitly asks for batch job creation by calling the API START_OF_BACKGROUNDTASK in the same flow that creates the queue entry.
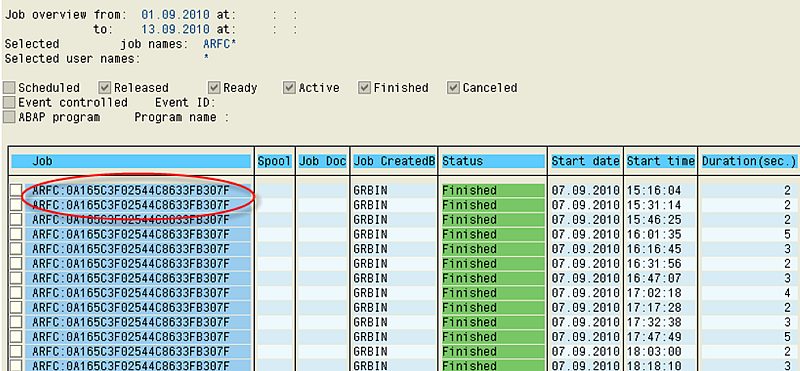
Background jobs with the name ARFC:<XXXX> can be seen in SM37:

The job logs show that these jobs are running report RSARFCSE:

The job RSARFCSE is responsible for asynchronous remote function calls that have not been successful.
For every unsuccessful ARFC found in table ARFCSSTATE a job called ARFC:<xxxxxxx> is created. In table ARFCSSTATE you can see the destination for the ARFC call.
The job will be created if there is a connection failure and the scheduler automatically creates a batch job for such connection failures. So if the tRFC call is in status CPICERR, then the entry will be retried as per settings in tRFC options. If you do not see CPICERR status and instread see SYSFAIL status, then there will not be any automatic retry.
Once you have determined the target system for the ARFC calls (as per table ARFCSSTATE), use transaction SM59 to check whether this is a valid RFC destination.
It is possible to disable these background jobs if errors occur with the connection. to do this, go to the tRFC options for the relevant RFC destination reporting the connection error:

In the screen that follows, select Suppress background job if conn.error.
The RFCs can then be reprocessed by scheduling report RSARFCEX. You can also delete the already scheduled jobs with report RSBTCDEL if there are too many.
Using the option Suppress background job if conn.error stops the creation of these ARFC:<XXXX> background jobs. You can then reprocess the failed tRFC calls by scheduling report RSARFCEX at regular intervals.
In the second case listed above, these batch jobs are also created if the application explicitly asks for batch job creation by calling the API START_OF_BACKGROUNDTASK in the same flow that creates the queue entry.
To see this, check the ARFCSSTATE tables's ARFCRESERV field. There you would see the BATCHPLA flag set (ARFCRESERV is a continuous string, BATCHPLA flag corresponds to the offset as per ARFCRESERV structure (you can open ARFCRESERV in transaction SE11 to see this)). If this is the case, the issue must be checked with the corresponding application.
Error: Connection does not exist
Possible cause
If you get the error message Connection does not exist when trying to activate an Extractor in transaction /n/QTQV/ACTIVATE, it is because the Logical system environment has been damaged.
Proposed action
Create a new Logical system environment in transaction /n/QTQVC/EXTRACTOR_ADM with a name that has not been used before. Try to activate the Extractor with the new Logical system.
OLAP Connector
Hierarchy Selection variables in the select dialog in QlikView
Possible cause
The OLAP Connector has the limitation: It cannot handle Hierarchy Selection variables in the select dialog in QlikView.
Proposed action
There are two possible solutions.
- Recreate the BEx query in SAP Query Designer with static filters for the desired hierarchy to get around the variables issue.
- Manually modify the variables section in the load script in QlikView.
When entering values for Hierarchy Selection variables in the select dialog of the OLAP Connector, the selectable values are not correct. The value selection list shows all leaves of the InfoObject instead of the available hierarchies. The same behavior occurs when selecting values for a Hierarchy Node variable that is dependent on a Hierarchy Selection variable. The variable names of these will be entered correctly into the script but the variable values will not be correct.
If you are modifying the load script, you must know the SAP technical name of the hierarchy and the hierarchy node. These names can be retrieved by calling function modules in SAP, transaction SE37, or by calling the same function modules using the Qlik SAP BAPI Connector.
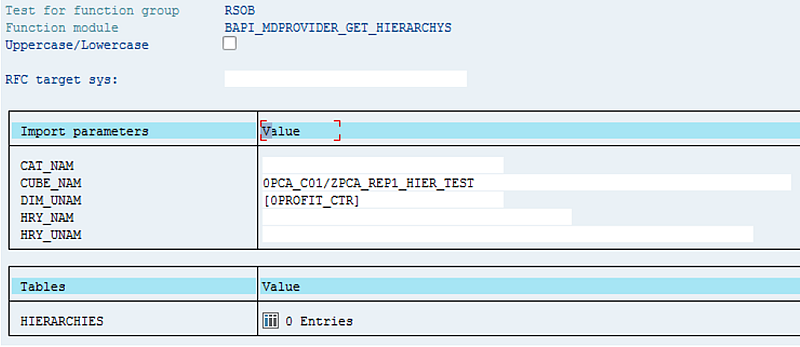
Hierarchy: Call function module BAPI_MDPROVIDER_GET_HIERARCHYS with the input parameters CUBE_NAM = <InfoProvider>/QueryName> and DIM_UNAM = [<infoObjectName>].

The result is displayed in the table HIERARCHIES, column HRY_UNAM. Copy the content of the column to the Hierarchy Selection Variable. Keep the blank spaces between 0PROFIT_CTR and 10000H1.
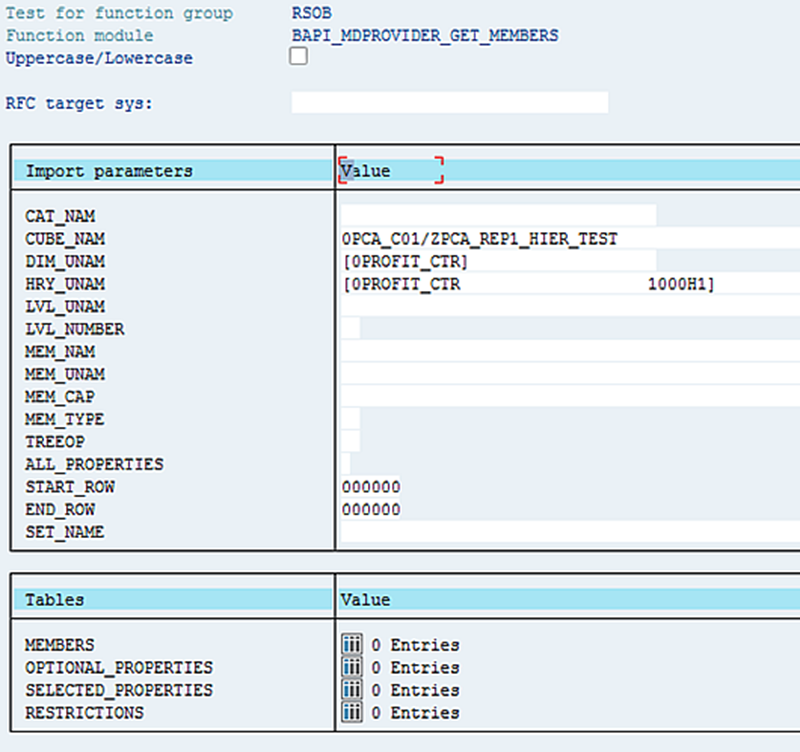
Hierarchy node: Call function module BAPI_MDPROVIDER_GET_MEMBERS with the input parameters CUBE_NAM = <InfoProvider>/QueryName> and DIM_UNAM = [<infoObjectName>] and [<InfoObjectName> <HierarchyName>] (retrieved in the previous call to BAPI_MDPROVIDER_GET_HIERARCHYS).

The result is displayed in the table MEMBERS, column MEN_UNAM. Copy the content of the column to the Hierarchy Node variable, retaining the blank spaces.
The final result should look like this:
[0H_PCTR] (I = [0PROFIT_CTR 1000H1]),
[0N_PCTR] (I = [0PROFIT_CTR 1000H1].[1000HE 0HIER_NODE])),
From (0PCA_C01/ZPCA_REP1_HIER_TEST));
The structure of the field lengths should be as follows, see the example below:
- The first line should have 30 characters after the second left bracket, inclusive of the name (0PROFIT_CTR in this example), before 1000H1.
- The second line should have 30 characters after the second left bracket, inclusive of the name (0PROFIT_CTR in this example), before 1000H1, and following the next left bracket, there should be 32 characters, inclusive of the name (1000HE in this example), before 0HIER NODE.

Query Connector error: DATA_TO_MEMORY_NOT_POSSIBLE
This indicates that more authorization is required. Compare SAP not 2212180.
An SAP query might check authorization objects that are not part of the Qlik roles. In that case, they can be added to the role QTQVCACCESS or added to an additional customer-developed role that is assigned to the Qlik SAP user. A user with SAP_ALL authorization can be used to verify that it is an authorization problem.
SQL Connector
Currencies that do not use two decimals
Currency values are stored in the SAP database in fields with the data type CURR (stored as data type DEC with two decimals). However, not all currencies use two decimals. To handle currencies that do not use two decimals, first find the corresponding currency key. For example, in the database table VBAP there is a currency field NETWR and the corresponding currency is found in the field WAERK.
Check to see if the currency key is present in the database table TCURX. The number of decimals used for the currency is stored in the field CURRDEC. If it is not present in the table, the currency has two decimals and no conversion is necessary.
To get the correct value of VBAP-NETWR if the currency is found in table TCURX:
- If the number of decimals = 0, multiply the value of VBAP-NETWR with 100.
- If the number of decimals = 1, multiply the value of VBAP-NETWR with 10.
- If the number of decimals = 3, multiply the value of VBAP-NETWR with 0.1.
- If the number of decimals = 4, multiply the value of VBAP-NETWR with 0.01.
Script template:
Load
Num(NETWR,'########.##') as [Value], //Format the field so that it looks like the default format with 2 decimals in SAP.
WAERK as Currency;
SELECT NETWR WAERK FROM VBAP;
Left Join Load
CURRDEC as NoOfDecimals,
CURRKEY as Currency;
SELECT CURRDEC CURRKEY FROM TCURX;
//In separate table, create shifter values based on the number of decimals. ShifterTable:
Load
*,
If(NoOfDecimals=0,100,
If(NoOfDecimals=1,10,
If(NoOfDecimals=3,0.1,
If(NoOfDecimals=4,0.01,
If(NoOfDecimals=5,0.001,
1))))) as Shifter
Resident DataFromSAP;
Load
Currency,
Value,
Num(Value*Shifter) as NewValue //A simple multiplication of the shifter value that was set based on the number of decimals resident ShifterTable;
DROP Tables DataFromSAP, ShifterTable;
The table TCURX can be changed from the transaction OY04 or use transaction SM30 with table TCURX and press the Customizing button.
Create and find Trace records
To activate the trace, add the property ;trace=1; or ;trace=true; to the connection string:
Reload the script.
You can delete old Trace records from the database by using the transaction /n/qtqvc/delete in the SAP system. Starting in version 6.3.0, it is also possible to delete records in the background by using transaction /n/qtqvc/delete_bgd. This transaction is suitable for use when deleting a large number of records.
To retrieve the Trace records:
- Find the Jobnumber in the SQL Connector log.
-
Go to the first screen of transaction SE16, enter the Jobnumber in the field JOBNUMBER and click Execute.
Enter a large value in the field Maximum No. of Hits to avoid limitations in the number of displayed records. For example, 2500.
Also, enter a large value in the field Width of output list to be able to view all columns. For example, 20000.
- Click Execute.
- Sort the TIMESTAMP column in ascending order.
The column TRACE now contains information about the job in chronological order. TASKTYPE shows which Function module or program was involved in the step:
- O = (the function module that performs the first steps in each job).
- B = (the program that does the fetch of data from the database).
- F = (the function module used to get the data and send it to Qlik.
You can now analyze the information in the Trace records and save the records in a spreadsheet, using the System menu (List > Save > Local File).
Connection string properties
The connection string properties can be useful for modifying the behavior of the connector. For example, to get a preview of the resulting records of a SELECT statement, set the properties FetchBuffers=1 and PacketSize=100. This will fetch 100 rows when the statement is reloaded.
Error: Fetch aborted due to incorrect number of rows
This error indicates that the size of the shared export/import buffer in the SAP system might be too small. Check the size value in transaction RZ11 for the parameter . The recommend size can vary depending on the SAP system. As a reference, a Qlik test system has the value 83876. The SAP BASIS team can increase the value if it is too small.
Connector version 7.0.1 gets stuck while establishing new data connection
In version 7.0.1 the SQL connector requires that you use the Data Manager to load your data when using Qlik Sense version September 2019 or later.
Possible cause
You are using the Data load editoron Qlik Sense version September 2019 or later, with SQL connector version 7.0.1.
Proposed action
Use the Data Manager to load your data instead of the Data load editor.
