Predicting with the time series deployment
After you have deployed and approved your time series model, you can create time-specific forecasts. In this tutorial, we create a prediction configuration within the ML deployment and use it to run a batch prediction.
So far, we have used daily sales data to create a machine learning model. The goal with this process has been to recognize patterns through machine learning, with the goal of applying them to new data.
Understanding predictions with time series models
It is important to distinguish between how predictions work for time series models, since it is different from predictions for other model types. The steps you complete to prepare your apply dataset are different from the steps for other model types.
With time series models, new predictions are added as new rows rather than being added as a separate column.
Creating an apply dataset
This section outlines how you can create your apply dataset for this time series problem. The actual process of compiling the dataset rows is not shown, but the workflow is.
Linear diagram outlining the needed components, and timeline, of an apply dataset that is used to generate predictions with a time series forecasting model.

Column structure
Your apply dataset needs to contain the same schema as the time series model you deployed. The schema can be found when you open the ML deployment.
In any case, the apply dataset should include the same columns as the model schema — in other words, a column for each of the following:
-
Date index
-
Target
-
Groups
-
Features (covariates)
Row structure
Your dataset needs to contain records (rows) as follows:
-
Columns and column headers for all columns included in the training dataset.
-
The same time step as the training dataset.
-
As many or more historical data records (per target and group) prior to the forecast cut-off time as the number of records in the apply window for the model. These need to be full records containing the historically observed date or time stamp, target, and covariate values. The apply window is determined by the forecast window and gap configured during training — the longer into the future you need to predict, the more historical data you need in your apply dataset to run predictions.
-
Records for all future time steps in your forecast horizon. For these future records, only include the values for the date index column, as well as any future features. Leave the values for the other columns blank.
Other modifications
You might need to make other modifications to the dataset so that it matches the model schema. In particular, grouped features, when selected as groups during training, are automatically transformed to the categorical feature type so that they can be used as groups. In your apply data, if you have features containing numeric data that you are using as groups, you will need to transform their data type so that it is identified as categorical data. An example of this is shown in Preparing the dataset.
Preparing the dataset
This tutorial provides an apply dataset that has already been configured with the required columns and records. However, the provided apply dataset contains a numeric column, store_nbr, that was configured as a group in the model. So, you need to create a script to transform this column to string data.
Do the following:
-
Go to the Create page of the Analytics activity center and select Script.
-
Enter a name for your script, for example, Transformed apply data.
-
Choose a space for your script. It needs to be the same space where you stored the original apply dataset.
-
Click Create.
-
In Script, switch to Editor.
-
Under Sections, click
to add a new section.
-
Paste the load script below into the editor.
-
Click Export data.
Running the script to export a new version of the apply dataset to Qlik Cloud Analytics.

After the script runs, a new apply dataset, Final transformed apply dataset.qvd, should be located in the same space as the original apply dataset.
Creating predictions
Now that you have a compatible apply dataset, use it to create predictions from your ML deployment.
Do the following:
-
In the catalog, open the Sales forecasting deployment deployment you created in Deploying a time series model.
-
In the bottom right corner, click Create prediction.
-
In the Prediction configuration pane on the right side, under Apply data, click Select apply dataset.
-
Select the apply dataset file: Final transformed apply dataset.qvd.
-
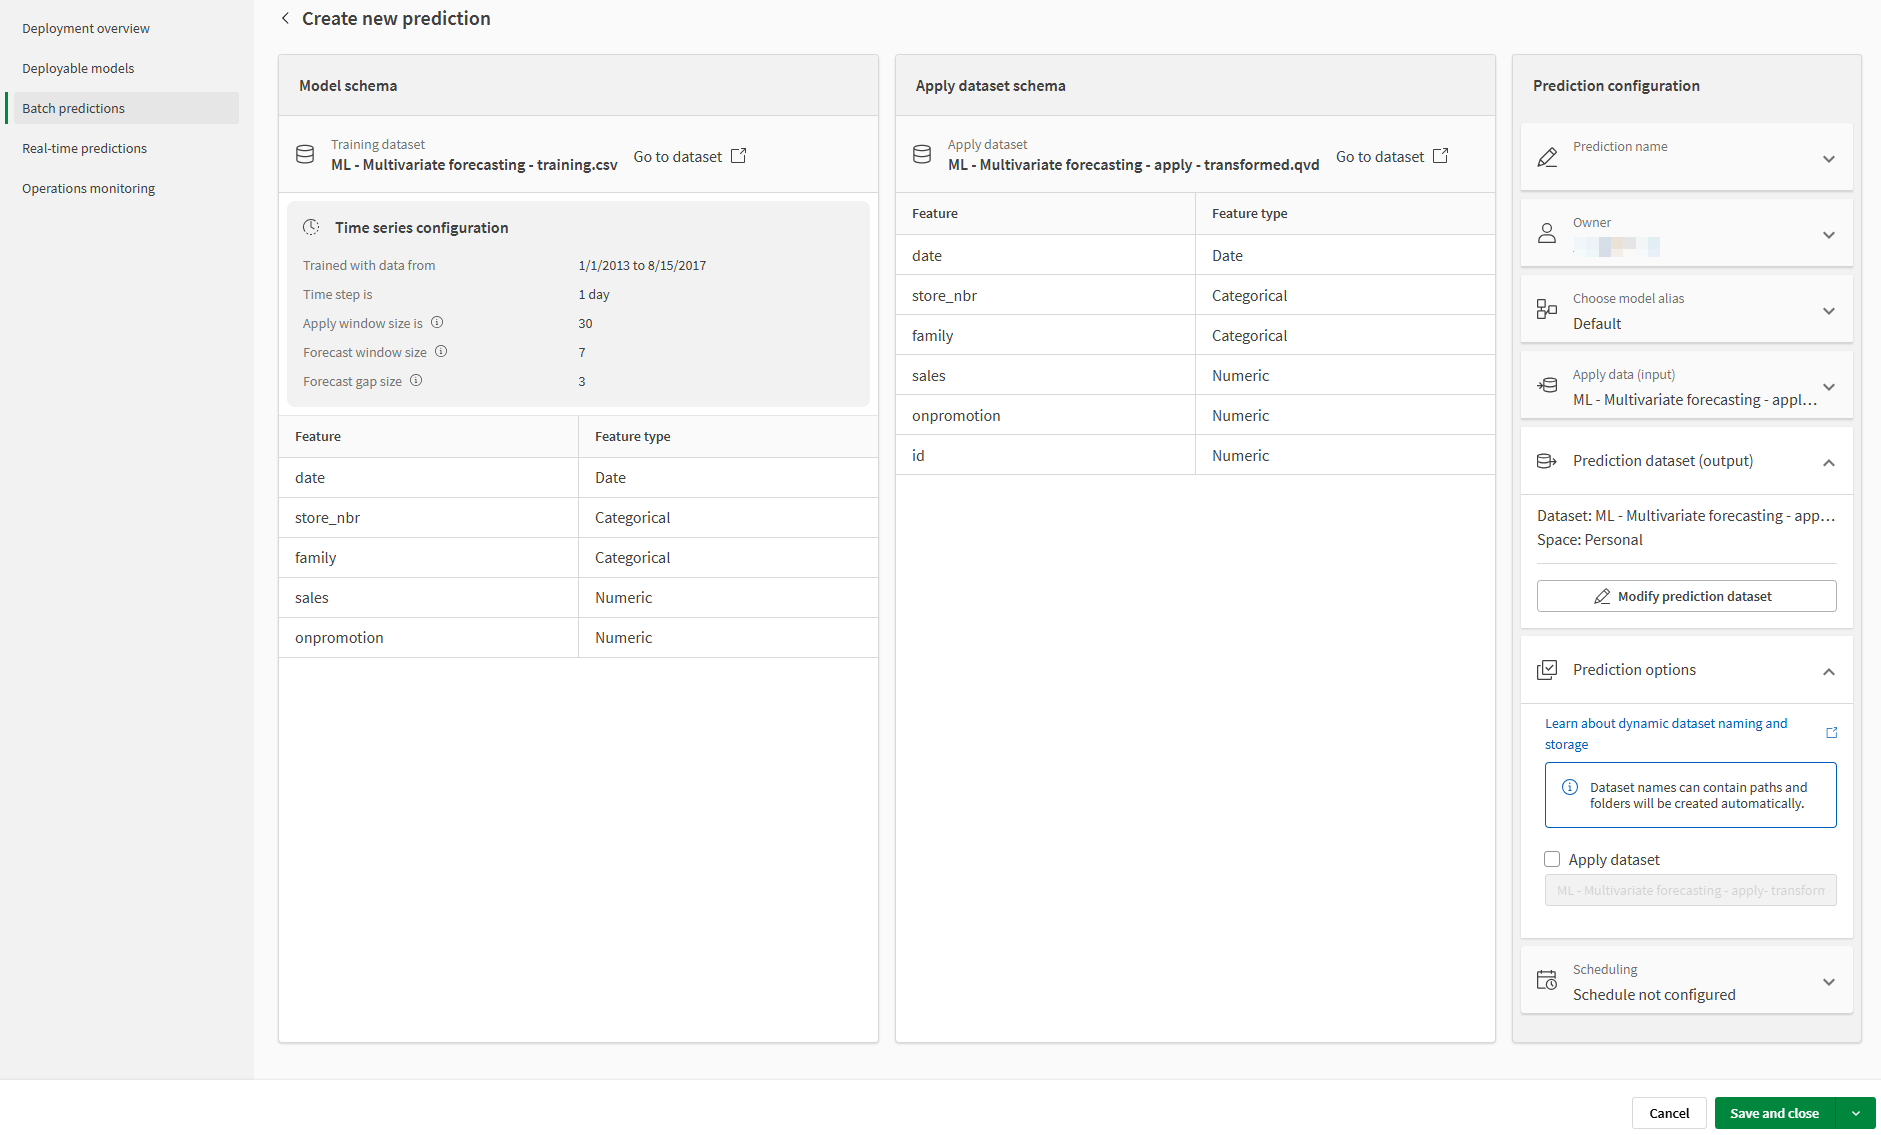
Compare the schemas of the training and apply datasets. There should not be any schema mismatch errors.
-
In the Prediction configuration pane, click Name prediction dataset. Type the following name: ML - Sales predictions. Use the default Parquet format.
-
Select a space and click Confirm.
Prediction configuration showing schema comparisons and configuration panel.

Click the icon next to Save and close. Select Save and predict now.
The process can be monitored in Dataset predictions. You can review the output in the catalog by clicking Open in the popup that appears.
When the prediction has finished running, create an app to view your predictions. Move to the next topic.
