Selection states
Now you know how to make selections, but what happens when you make a selection? Selections filter out a subset of the data. Use selections to focus on something you want to know more about.
Green, white, and gray
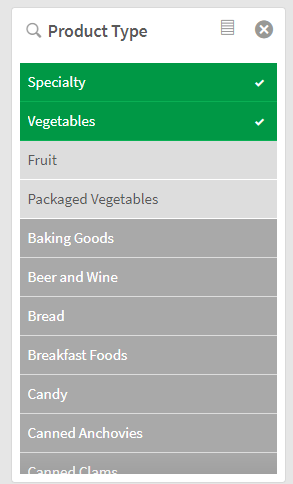
When you make selections in filter panes, the colors of the values change accordingly. The characteristic colors are green, white, and gray, and they represent the basic states: selected, possible, and excluded. The excluded values exist in three different variants. In addition to the normal excluded state, there are also the alternative state and the selected excluded state. These will be described later.
| State | Color |
|---|---|
| Selected | Green, with a check mark as a selection indicator |
| Possible | White |
| Alternative | Light gray |
| Excluded | Dark gray |
| Selected excluded | Dark gray with a check mark as a selection indicator |
The point behind color coding is to bring you additional information. Green indicates what has been selected, white indicates the values that are possible to select, and gray indicates the values that have not been included in your selection. In particular, the gray values can bring you new information about relationships that were not known before. When a value unexpectedly turns gray after a selection it can lead to new insights, for example, that a certain region does not have any sales representatives, or that a product did not sell at all during a whole quarter.
Making the first selections
Let us make some selections in the app to get an understanding of the different states. But first, go to the sheet Product Details. In the top right corner, click and select the sheet Product Details.
You will compare the sales of a few different product types in Germany and Japan during 2012.
Do the following:
-
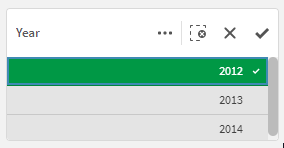
In the top left filter pane, click Year and select 2012 but do not confirm the selection.

When you click 2012 the value turns green to indicate that it is selected. The two other values, 2013 and 2014, turn light gray to indicate that they are alternative, which means that they are excluded from the selection. You can select either of the two if you want to change the scope, but by selecting 2012 you want the other years to be excluded, because you only want to see values for 2012.
As soon as you make a selection, the other visualizations are updated. You do not even have to confirm the selection to see the outcome, a preview is shown immediately. You can undo a selection by clicking .
After the selection of 2012, the filter pane Region does not change. It is still white, indicating that the values are associated and can be selected. The bar chart Total Sales is updated to display only the sales for 2012, and, likewise, Product Treemap shows the product groups that were sold in 2012. You can see the difference if you click 2012 again to deselect it. When no selection is made, the bar chart and treemap both display the values for all three years, but when 2012 is selected, only the values related to that year are displayed.
Do the following:
-
Make sure 2012 is selected.
The selections bar above the sheet shows the new selection. More about that later.
-
Still in the time filter pane, click Quarter and select Q1. Confirm the selection.
The new selection is added to the selections bar, and the bar chart and treemap are updated.

- So far, you have selected 2012 and Q1. Click Month.
- Click
to leave Month without making any selections.
- In the selections bar, click
to clear the selection of Q1.
You can see that Jan, Feb, and Mar are possible values (white), whereas the other months are excluded. This makes sense, because the possible values are months in the first quarter, which you selected, and you could refine your selection further by selecting one or two of the possible months. Selecting all three would not constitute a new selection, because that is equal to selecting Q1, which has already been selected.
The selection 2012 should now be the only selection.
Selecting regions and product types
Let us compare the sales of fresh vegetables in Germany and Japan.
Do the following:
-
In the Region filter pane, select Germany and Japan and confirm.
-
In the Product Treemap, select Produce and confirm.
-
In the treemap, select the product type Vegetables.
- In the top right corner, click
to go to the sheet Dashboard.
-
In the selections bar, click Product Type to open the list.
-
Deselect Vegetables and select Specialty instead. Confirm.
- Go to the sheet Customer Location.
By selecting Vegetables you exclude the other product types, Fruit, Specialty, and Packaged Vegetables, which are part of the same product group Produce, but are not fresh vegetables.
To be able to see the relationship between the two countries, you need to change sheets.
In the pie chart, Sales per Region, you can see that the sales for 2012 is almost exactly twice as big in Japan as in Germany.
To instead see the figures for Specialty, which is nuts and almonds, do the following:
With this selection, Germany has the highest sales, and therefore that value is presented first in the pie chart (counting clockwise from 12 o' clock).
Now that you have changed sheets, there are some other things to notice. The selections in this sheet are exactly the same as the ones in the Product Details sheet. Selections are global. This means that when you make a selection in a visualization, the selection is reflected in all related visualizations, no matter what sheet they are on. Consequently, the selections bar looks the same when you move between the different sheets. The selections bar shows all selections regardless of which sheet they were made on.
You can see that the regions Germany and Japan are still selected, and that these are the only areas showing data in the map Location.
The excluded values
When you deselected Vegetables to instead select Specialty, the first four values are possible values that can be selected.
When Specialty is selected, some values are alternative (light grey) and some are excluded (dark grey).

Specialty is selected and the following three values are alternative, that is, they are excluded, but only by the selection of Specialty. The values after Vegetables, on the other hand, are already excluded by a selection in another list, and are therefore dark gray.
What would happen if you selected the excluded value Bread?
Do the following:
- In the selections list for Product Type, select Bread.
The value is selected (with a check mark) but remains dark gray, that is, it is selected excluded. The selection of Bread is not compatible with the already existing selections. But the value is still selected and will become green if the selection that excludes it is cleared or if the product group to which it belongs, is included in the selection.
Selected excluded values become selected
You can make the excluded value Bread become selected by doing one of the following.
- In Product Group, select the value Baking Goods, which is light gray, alternative.
- In Product Group, clear the selection Produce.
- In Product Type, clear the selection Specialty.
Stepping back in the selection history
What if you want to return to the selection with Vegetables? If you remember all the selections, the quickest way is perhaps to make the selections again. But with more complex selections it may be difficult to remember all the selections, and you could easily overlook something. A safer option in that case would be to step back in the selection history.
Selection history options in the selections bar

In the selections bar, there are options for stepping back and forward in the selection history. All the selections you have made during this session are stored and you can return to them by using the step back (>) and step forward (
) options. It is not until you have stepped back that you can step forward. By default, you are at the last step in the selection history and therefore you cannot step forward, because there is no later step.
Bookmarks
Bookmarks let you save specific selection states so they can be applied again in an app later and shared with other users. Layout information can be stored in bookmarks, so users can be taken to the correct place in the app when applying the bookmark. For more information, see Bookmarking selections.
Thank you!
You have reached the end of this tutorial. You now know the basics of Qlik Sense: how to make selections and interpret the results. If you want to learn how to build an app, download Qlik Sense Tutorial - Building an app and get an understanding of all the steps involved in app building.
