GeoAnalytics example: Simplify
You can load files containing geographic data or shapes into Qlik Sense. If your shape files are large or complex, however, they may be too detailed to make an effective map visualization in Qlik Sense. Large or complex datasets may also take longer to load in a GeoAnalytics map. The Simplify operation can be used to reduce the complexity of your data. Simplify returns a table with a field that contains the simplified geodata for your maps, smoothing and simplifying how your data appears in GeoAnalytics layers. This enables you to create smoother layers in your GeoAnalytics maps when high levels of detail are not needed and potentially solve slow loading issues with heavily detailed geodata.
This example will show you how to use the Simplify operation to process and load geodata into a GeoAnalytics map.
Example
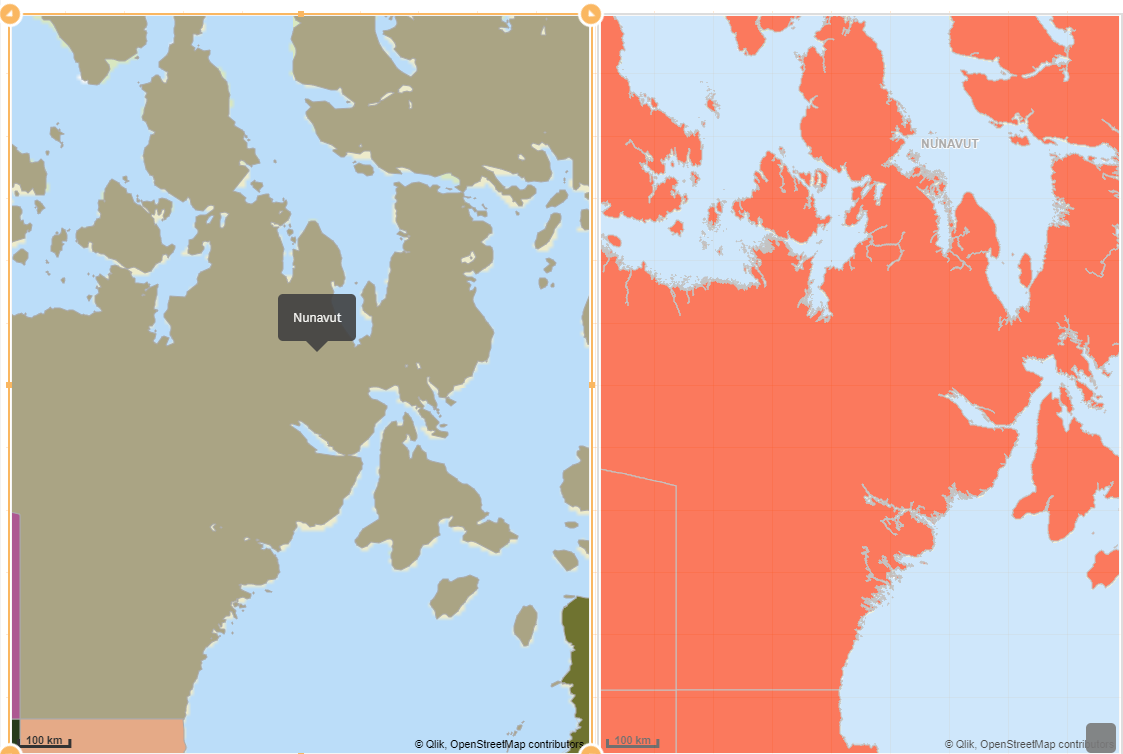
We have a shape file containing the Canadian federal electoral districts that we want to use to create a GeoAnalytics map displaying all the districts. When the shape file is loaded into a GeoAnalytics map in Qlik Sense, the visualization is slow to load and there are a lot of fine details in the lines that are not necessary for showing a map of all the districts, as the comparison below illustrates.
Comparison of area layers between the simplified area layer (left) and original shape data area layer (right)

It is possible, however, to improve the usability of a map while preserving the shapes from the geodata.
To solve this problem, this tutorial will load the shapes of the Canadian federal electoral districts using Simplify to process the shape file and create more usable shape data for a map visualization.
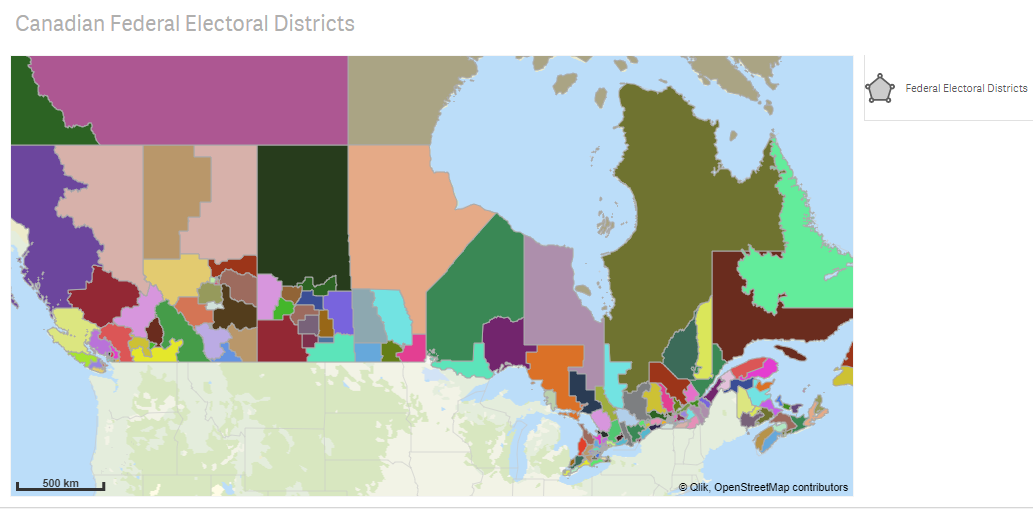
Map of Canadian federal electoral districts

This example creates a map with the Canadian federal electoral districts as an area layer. This example also adds custom info bubbles to display the each district's name when the cursor passes over it.
Dataset
The shape file used in this example, gfed000b11a_e.zip, is available from Statistics Canada. If you have installed GeoAnalytics Plus, you can store the file locally. Otherwise you can use its URL performing the Simplify operation using the GeoAnalytics Connector.
Statistics Canada - gfed000b11a_e.zip
Instructions
After you create a new app in Qlik Sense, you can begin creating your map. To make the example map, you must complete the following tasks:
- Add the GeoAnalytics Connector.
- Load the dataset using Simplify.
- Add the map layer.
- Add the area layer.
1. Adding the GeoAnalytics Connector
The first step is to create a GeoAnalytics Connector with which you will use to simplify the shape files. If you have an existing GeoAnalytics Connector, you can use it with this example. Otherwise, you will first add a new section in Data load editor and then add a connector.
Do the following:
- Open Data load editor.
- Click Create new section.
- Type GeoData.
- Click Create new connection > Qlik GeoAnalytics Connector.
-
In the GeoAnalytics server drop-down, select your server.
- After Connection name, enter GeoSimplify.
- Click Save.
2. Loading the dataset using Simplify
Next, you use the Simplify operation in your connector to load the dataset. You specify the type of dataset, the location, the file type, the expected geometry in the file, and the coordinate reference system (CRS).
When Simplify returns the new simplified table along with the table for the existing dataset, you select the fields you require: Dataset_Simplified_Geometry, the new simplified geography field, FEDNAME, the list of district names, and _autoIndex_, a field created during the Simplify operation that serves as a key field so the simplified geometry has associations to the information in the original dataset.
Do the following:
- In the Data connections pane, under GeoSimplify, click
.
- After Operation, select Simplify.
- After Type, select File based geo dataset.
-
After URL, do one of the following depending on if you are using GeoAnalytics Plus:
-
If you have GeoAnalytics Plus, type your file path to gfed000b11a_e.zip in the following format: file:///<file path>.
For example, file:///C:/Share/gfed000b11a_e.zip.
- If you are not using GeoAnalytics Connector Plus, type the following URL: http://www12.statcan.gc.ca/census-recensement/2011/geo/bound-limit/files-fichiers/gfed000b11a_e.zip.
-
- After File Type, select ESRI shape file.
- After Expected Geometry Type, select Polygon.
- After CRS, enter EPSG:4269.
- Click Next.
- From the table Dataset_Simplified, select the fields Dataset_Simplified_Geometry and _autoIndex_.
- From the table Dataset, select the field FEDNAME and _autoIndex_.
- Click Insert script.
- Click Save.
- Click Load data.
3. Adding the GeoAnalytics map
The next step is to add a GeoAnalytics map to your sheet.
Do the following:
- In sheet view, click
Edit sheet in the toolbar.
- Click
to open extensions.
- Drag and drop GeoAnalytics Map into your sheet.
4. Adding the area layer
Finally, you add an area layer to the sheet that uses the simplified shapes field and configure it to use Dataset_Simplified_Geometry as a dimension. In addition, you add a custom info bubble that displays the federal electoral district name.
Do the following:
- In sheet view, click
Edit sheet in the toolbar.
- Click
to open extensions.
- Click Add dimension and select Dataset_Simplified_Geometry.
- Click Location ID.
- Click Add measure and type FEDNAME.
- Click Location Options.
- In the Location Source drop-down, select Dimension.
- Click Appearance.
- Click Legend.
- Set Color Legend to Custom.
- Clear Show Colors.
- Click Colors.
- Set Colors to Custom.
- Select By dimension.
- Select 100 colors.
- Click Info Bubble.
- Set Info Bubble to Custom.
- As the expression, type FEDNAME.
- Click
Done.
Result
You now have a more responsive map containing an area layer of the Canadian federal electoral districts.
