Preparing to migrate
The first step when preparing to migrate is to do an inventory analysis of your current Stitch environment using the Stitch inventory tool. It is also recommended that you review the available application connectors in Qlik Talend Cloud and learn about the differences in data loading and data extraction between Stitch and Qlik Talend Cloud.
Performing an inventory analysis
Before migrating your replication tasks to Qlik Talend Cloud, it is recommended that you download and run the Stitch inventory tool to create an inventory list of your current Stitch environment. This includes current sources, destinations, and schemas. After you have completed the migration, use the inventory report as a reference to compare and confirm that you have moved all activities Qlik Talend Cloud.
The Stitch inventory tool, is available as part of the Qlik Talend Cloud migration toolkit. Use your Stitch API key to run the tool and generate an inventory report of your Stitch environment.
Do the following:
-
Download and install the Qlik Talend Cloud migration toolkit from the Qlik Talend Cloud migration toolkit User Guide
-
Select the download link that is compatible with your operating system.
-
Unzip the file in a dedicated folder, and then run the start_qtcmt.bat file.

-
-
On the main page of the Qlik Talend Cloud migration toolkit, select Get Started.

-
Sign in or register with your email and password.
-
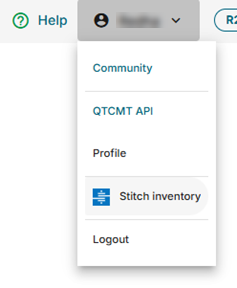
After you are signed in, select your profile name on the upper right side of your screen, and then select Stitch inventory from the dropdown menu.

-
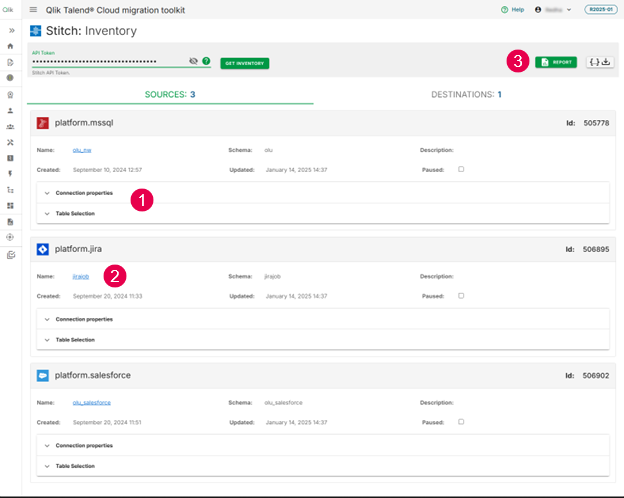
In Stitch: Inventory, under API token, paste your API token, and then select Get inventory. For information about how to generate your Stitch API token, see Generate a new Import API access token.

-
Review the generated inventory list of Sources and Destinations to see details about each item, such as name, schema, and dates. You can also do the following:
-
Expand the Connection properties and Table selection sections to see more details.
-
Select the source name link to go to the source settings in Stitch.
-
Select Report in the upper right side of your screen to export your inventory as a generated PDF report.
-
Example of an inventory list of sources and destinations: 1. Connection and table details for the source, 2. Link to the source in Stitch, 3. Generate a PDF report of your inventory

Source and target connections in Qlik Talend Cloud
Qlik Talend Cloud has many connectors available to land or replicate data from a large number of SaaS application sources and targets. Many of the commonly used integrations in Stitch have been added to Qlik Talend Cloud. However, since Stitch and Qlik Talend Cloud are different platforms, you will notice some differences when you move your pipelines. For a list of available application connectors, see Supported SaaS applications. If you don’t see the connector you need in Qlik Talend Cloud, go to Qlik Ideation and let us know. To submit an idea or upvote an existing suggestion, you must log in to the Qlik Community portal. Use the product filter to select Qlik Talend Cloud.
Differences in data loading
Since Qlik Talend Cloud and Stitch are different platforms, each platform loads data from the same source slightly differently. You will notice differences in the destination schema, data typing, the method used to load semi-structured data, and the replication method used.
Schemas
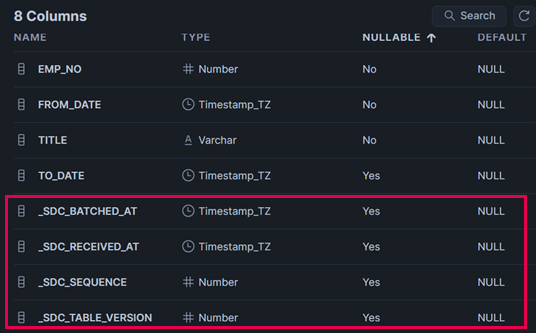
When loading the same dataset in Stitch and Qlik Talend Cloud, different destination schemas are created. For example, Stitch creates system columns to track different metadata created by the Stitch platform (such as _sdc_created_at, which is a timestamp that tracks when the Stitch pipeline received the extracted record). However, Qlik Talend Cloud does not create system columns.
Example: Schema analysis when loading data from MySQL to Snowflake
The following image highlights the system columns created by Stitch as well as the extracted data in the same schema. In Qlik Talend Cloud these system columns do not exist when loading the same dataset.
Schema showing system columns created by Stitch

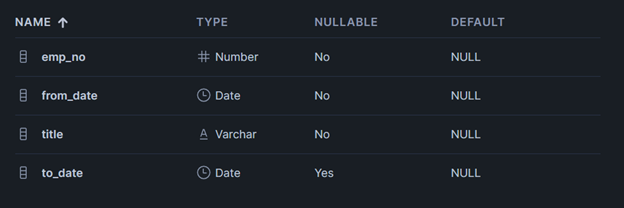
Schema created by Qlik Talend Cloud with no system columns

In the example images, the from_date and to_date columns show different data typing in Snowflake after being loaded by each platform. Stitch automatically converts the DATE type to Timestamp, while Qlik Talend Cloud keeps the same type (DATE) in the Snowflake target schema. Notice that column names created by Stitch are capitalized, while Qlik Talend Cloud uses the same formatting as the original MySQL source.
For more information about schemas in Qlik Talend Cloud, see Schemas. The following video demonstrates schema differences between the two platforms

Data typing
Stitch and Qlik Talend Cloud have different automatic data normalization to make sure extracted data can be loaded into the specified target destination. This leads to certain changes in the dataset when loaded by each product.
Loading options
In Stitch, you can choose between two loading behaviors: Upsert and Append-only.
When data is loading using Upsert, existing records are updated, and new records are inserted. When data is loading using Append-only, existing rows are not updated. All records are appended to the end of the table as new rows.
In Qlik Talend Cloud, Upsert is the default loading behavior. To append historical data in Qlik Talend Cloud, use the Store changes option, which stores data changes in separate change tables.
Semi-structured (JSON) data
In Stitch, for destinations that natively support JSON data structures, JSON data is stored in the applicable supported type according to the target. However, for destinations that do not support JSON data structures natively, Stitch will flatten JSON objects and arrays into tables and columns.
In Qlik Talend Cloud, all JSON data will be stored as text in the chosen target.
Example - Loading JSON data in Stitch and Qlik Talend Cloud
There are some differences between how Stitch and Qlik Talend Cloud handle JSON data. The following examples highlight these differences using examples that load data to a cloud data warehouse and database.
The following JSON object is used as the sample semi-structured dataset for this example. It contains multiple nested objects and arrays that store information about specific sales reps for an account.
Cloud data warehouse
Loading the sample JSON object to a cloud data warehouse such as Snowflake, BigQuery, or Databricks provides the following results:
-
Stitch loads the dataset as a Variant data type and preserves it as a single record in the Snowflake table.
Dataset loaded by Stitch to Snowflake

The Data column will contain the same JSON information saved as Variant data type.
-
Qlik Talend Cloud loads the same data to Snowflake as Varchar.
Dataset loaded by Qlik Talend Cloud to Snowflake

Database
Loading the sample JSON dataset to a database, such as PostgreSQL, MySQL, or MSSQL, provides the following results:
-
Stitch de-nests the JSON record into separate sub-tables for each of the nested objects.
Dataset loaded by Stitch to a database

-
Qlik Talend Cloud maintains the same table structure as a single table and loads the JSON record as text.
Dataset loaded by Qlik Talend Cloud to a database

Differences in data extraction
Although many Stitch-certified sources are available in Qlik Talend Cloud, there are still some situations where data extraction will differ between Stitch and Qlik Talend Cloud.
Differences caused by different integration versions
All connections created in Qlik Talend Cloud will use the latest version. If your Stitch pipeline was using an older version, data extracted in Qlik Talend Cloud could be different. For example, you might see the following:
-
Some tables and columns might not be available.
-
Different data types between different versions.
-
Datasets might have different column or table names.
