Working with notes
Create, share, and collaborate on notes by performing the following tasks.
Create, view, and manage notes in the Notes tab in the assets panel when you are in analysis mode for a sheet.
For more information, see Notes examples.
Create a note
Do the following:
-
Open a sheet in analysis mode and expand the Assets panel.
-
Click Notes.
The Notes tab opens.
-
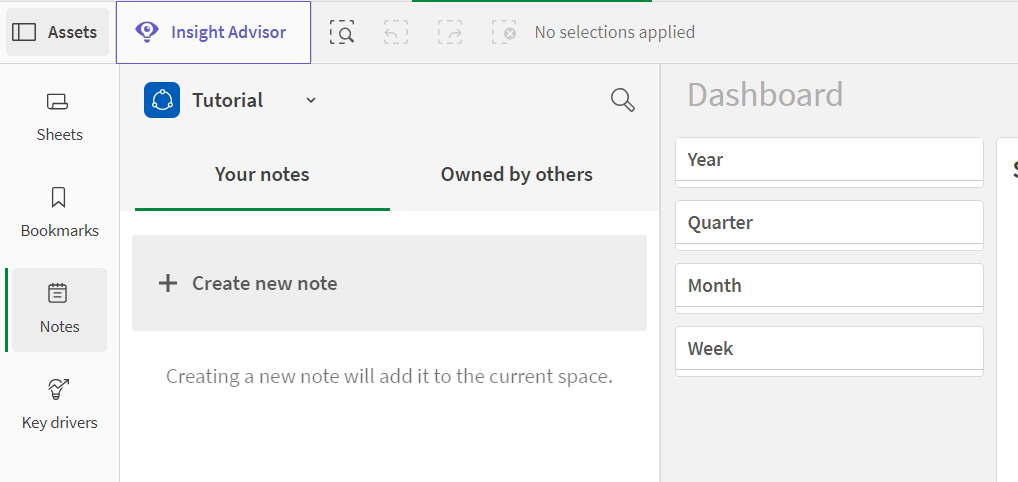
Select a space from the drop down list and click
Create new note.
The visibility of the note to other users depends on the space in which the note is created. For more information about sharing notes, see Share and manage space member access to a note.
Create new note in shared space
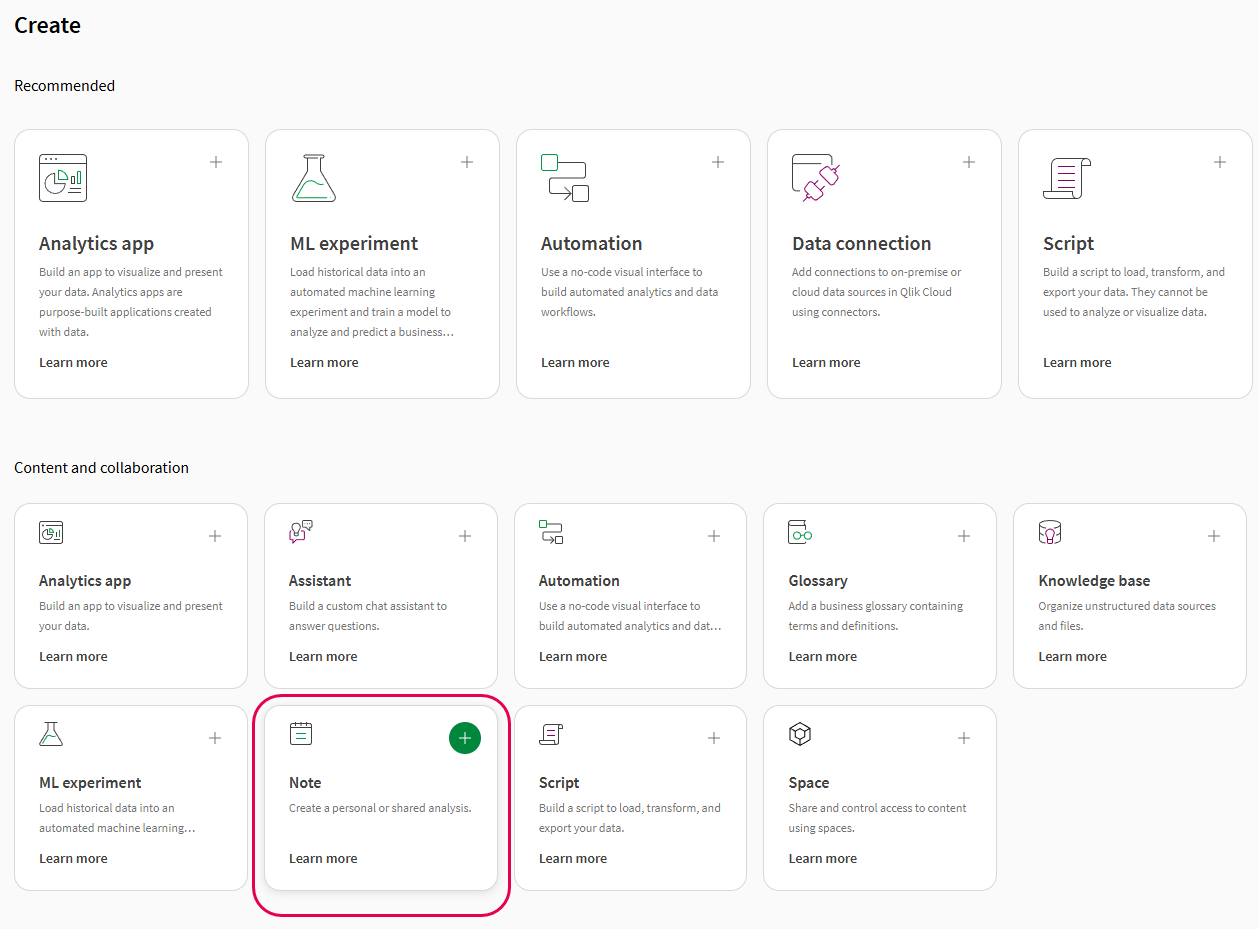
You can also go to the Create page in the Analytics activity center and select Note to create a new note.
Creating a new note from the Create page in the Analytics activity center
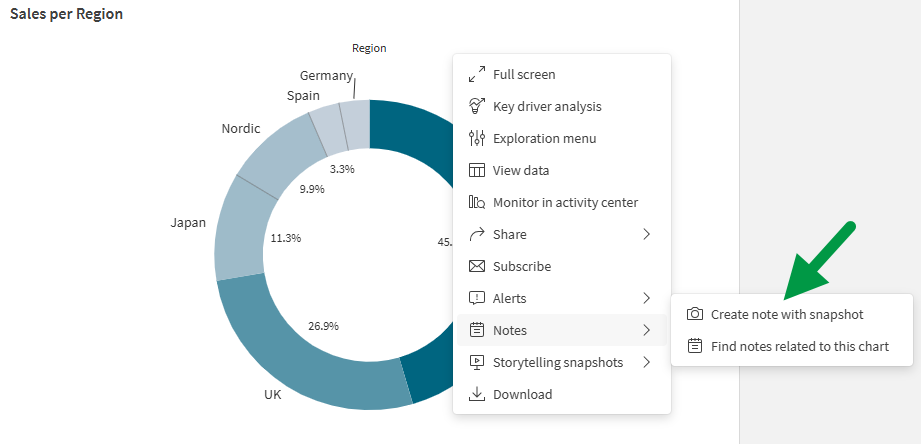
You can also create a new note from a snapshot. In sheet view, right-click a chart and select Notes, then click
Create note with snapshot. The snapshot is automatically added to the new note.
Create new note from a snapshot
Add and format text
Add text and use the formatting options in the toolbar.
Enter text in a note

Add snapshots of charts
Use snapshots to capture an image of a visualization at a certain point in time, and with various selections applied. These snapshots can be added to existing notes in the space.
Do the following:
-
Expand the assets panel from analysis mode in a sheet, and click Notes.
-
Open the note to which you are adding a snapshot.
-
Navigate to the part of the note where you would like to insert the snapshot.
-
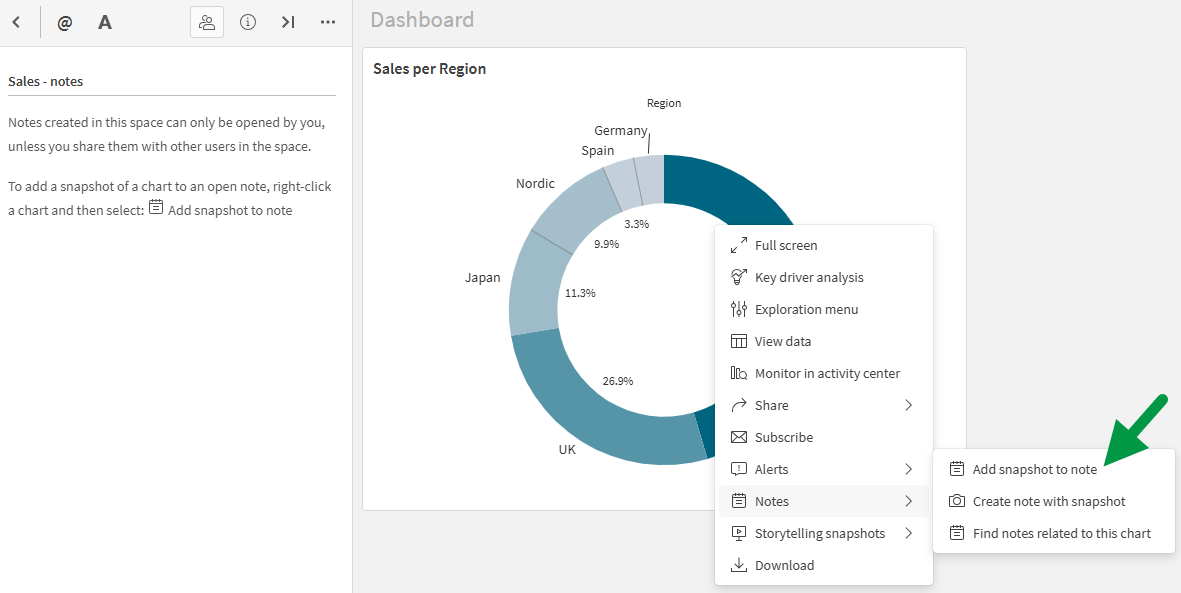
Right-click a chart and select
Notes, and then click
Add snapshot to note.
The snapshot appears in the note, and shows the chart at the point in time when you took the snapshot.
Add snapshot to a note
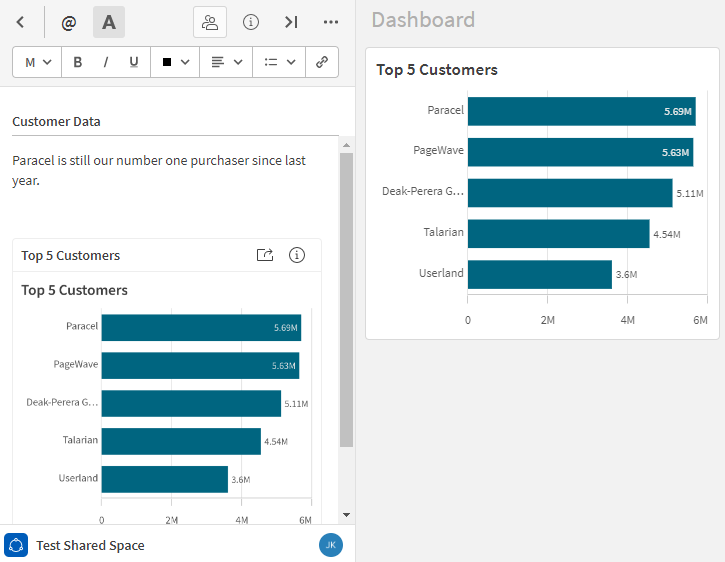
You can create a note from a snapshot, or add snapshots to a note from private or public sheets in personal, shared or managed spaces. All space members with access to the note can see the snapshots in the note. However, since only you can access your private sheets, other members will not be able to go to the sheet by selecting Link to source on the snapshot in the note. For more information, see Making app content public in shared spaces.
Snapshot added to a note
View notes linked to charts, sheets, and apps
When you add a snapshot of a chart to a note, the note is linked to the chart. The note is also linked to the sheet and app from which the chart was created.
You can use this to see how charts have been used in notes within a space, and to understand how others have interpreted the data in their analysis.
Linking charts to notes
You can link a chart to a note by either adding a snapshot of the chart to a note, or by creating a new note with a snapshot of the chart.
Do the following:
-
Right-click a chart, and then select
Notes.
-
Click
Add snapshot to note or
Create note with snapshot.
Either of these two actions can be used to link a chart to a note.
Expand the Notes tab to display a list of all notes created in the selected space, either your Personal space or the space in which your app is located. You can also toggle between Your notes and notes that are Owned by others.
In the Notes tab, notes might be organized into several categories, depending on the space in which they exist and whether they have been linked to a chart.
The categories are as follows:
-
Notes related to this chart: Shows all notes that contain snapshots of the selected chart. You can only see this category when you search a chart for notes that are linked to it. To see this category, right-click on a chart and select
Notes, then click
Find notes related to this chart . For more information, see View notes linked to a specific chart.
-
Notes related to charts in this sheet: Shows all notes that use snapshots from the sheet that is currently open. If you have searched a chart for related notes, this includes notes linked to all other charts in the sheet except the selected chart. Otherwise, it shows notes linked to all charts in the sheet.
-
Notes related to charts in other sheets: Shows all notes linked via snapshot from any chart in the app, except the charts contained in the sheet you have open currently.
-
All other notes: Shows all notes from the opened sheet and app that do not contain a snapshot, as well as notes from all other apps in the space (with and without chart snapshots).
If the notes are not organized by category, all of the notes in the space belong to the same category. In other words, the notes will only be grouped by category when there is a difference in how one or more notes are linked to charts using snapshots. For example, if none of the notes in the space are linked to a chart via snapshot (that is, they fall under the All other notes category), there will be no category headings displayed in the list.
List of all four possible categories for note content

View notes linked to a specific chart
You can quickly discover notes which use snapshots of charts in the sheet.
Do the following:
-
Right-click the chart which you want to explore notes for.
-
Select
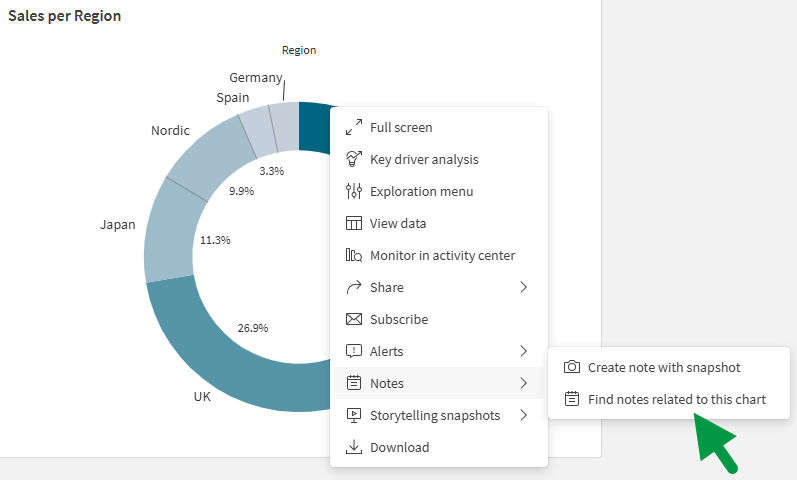
Notes, then click
Find notes related to this chart.
Find notes related to this chart
-
Check the Notes tab for any notes that might be listed under Notes related to this chart. For notes you have created, check Your notes. To explore notes created by other users in the space, switch to the Owned by others sub-tab.
When using Find notes related to this chart, you will automatically be switched between sub-tabs (Your notes or Owned by others) if there are no notes linked to the chart in the current sub-tab, but notes are linked to that chart in the other sub-tab.
Mention other users in a shared or managed space
In a shared or managed space, mention other space members so that they are notified of the note. Any member of the space who has been given access to the note will be notified if they are mentioned. Mentioned space members will only be notified the first time they are mentioned in a note.
Space members with only the Can publish or Can consume data space role cannot be mentioned in a note.
When you mention a user, you might also be prompted to change their access to the note. If the user does not have access to the note, you can select Make viewer or Make editor in the Mention tip notification. If the user has Can view access to the note, you can give them Can edit access by selecting Make editor in the Mention tip notification.
Type or click @ to view a list of all the coauthors and users previously mentioned in the note.
Mention coauthors and previously mentioned users in a note
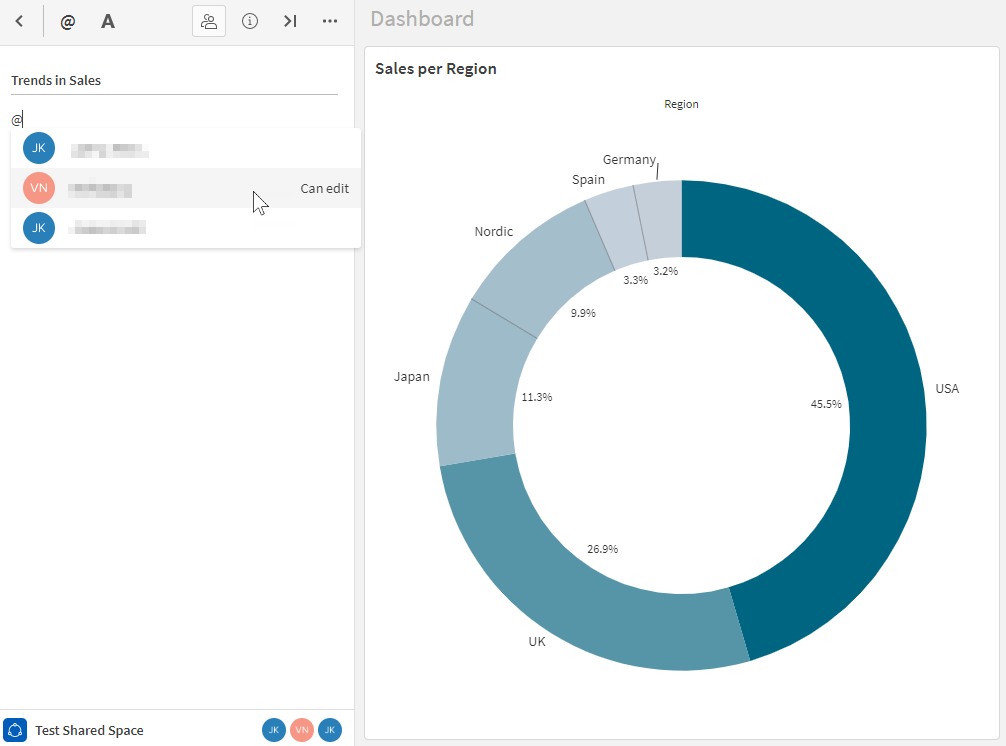
Type or click @ followed by three or more characters to search all users in the space, except users with only the Can consume data role. Only users with Can view or Can edit access to the note itself will be notified of the mention.
Type-ahead search for other members of the space

Share and manage space member access to a note
By default, notes that you create in a shared or managed space can only be viewed by you. You can allow other individual space members to view and edit the note. You can also make the note public so that additional space members can see it.
For non-public notes, users with the Owner or Can manage role in the space can see the note exists in the space, but cannot view its contents unless they have been given access to the note. If they have not been given access to a note, users with these space roles can share the note and modify individual user access to the note, but cannot make it public.
To share a note in a shared space with another individual space member, the space member with whom you are sharing the note must have any of the available space roles except Can consume data in the space. When a note in a shared space is made public, all space members, except users with the Can consume data role only, can open and view the note.
To share a note in a managed space with another individual space member, the space member with whom you are sharing the note must have any of the available space roles except Can publish and Can consume data in the space. When a note in a managed space is made public, space members with any of the following roles in the space can open and view the note:
-
Has restricted view
-
Can view
-
Can contribute
-
Can manage
If the note owner would like to allow other space members to modify access controls for the note, they can provide edit access to the note for these users (make them coauthors).
When you create a note in a shared or managed space, you become the note owner. All other space members except the note owner are given No access permissions on a newly created note. For information about the different levels of access that exist for a note in a shared or managed space, see Capturing and sharing insights using Notes.
Share a note with individual space members
For a note in a shared or managed space that has not been made public, you can provide Can view or Can edit permissions on the note to individual users in the space.
Do the following:
-
With the note open, click
Share.
-
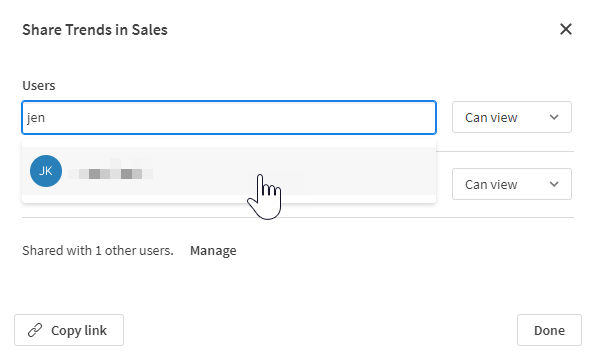
Under Users, start typing the name of the user you want to give access to.
-
Click the correct user and choose Can view or Can edit from the dropdown.
If the user already has one of the listed permission levels on the note, you can also change the access to another option here.
-
Click Share.
The user is given the selected access level on the note.
Share a note with another user
Manage individual member access to a note
You can also manage the permissions of each user with access to the note, switching the access level and removing access as needed.
Do the following:
-
With the note open, click
Share, then click Manage in the dialog that opens.
-
In the list of users, change the permissions of each user between Can view, Can edit, and No access.
If you remove a user's access to the note by switching them to No access permission level, they will not appear in this menu when it is opened again, unless their name is searched.
-
Click Done.
Change permissions on a note
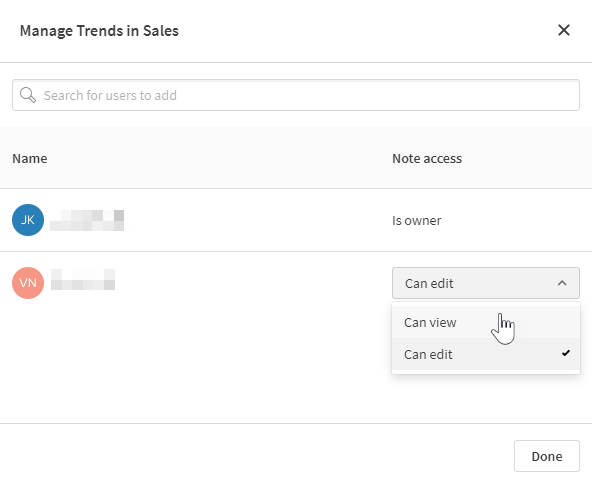
From this menu, you can also add other space members to the note. In the search bar, type at least three characters of the user's name to manage their access to the note.
Space members are notified when they are given Can view or Can edit access to a note.
Make a note public in the space
By default, a note created in a shared or managed space can only be opened by the creator of the note and other individual space members they have shared the note with. You can convert a note into a public note. When a note is made public, other space members will have the specified permission on the note. This can be done either from an app in the space or from an activity center.
Other users with the Owner or Can manage role in the space can share the note and modify individual user access to the note, but cannot make it public.
Do the following:
-
With the note open, click
Share.
-
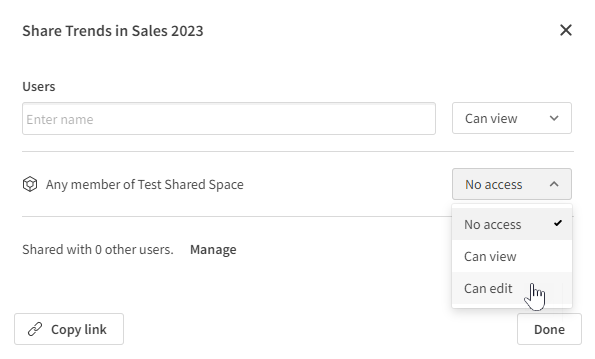
Expand the drop down for the global access level setting for the space (the option listing the name of the space). By default, this dropdown will have the No access option selected.
Making a note public in a shared or managed space
-
Select Can view to allow all space members to view the note. Select Can edit to allow all space members to view and edit the note.
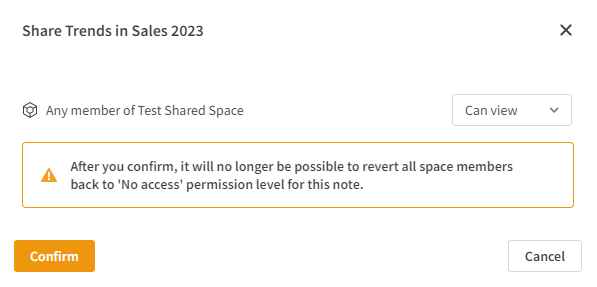
Warning noteOnce you have changed this setting to give all users access to the note, it cannot be undone. Once a note has been made public in a shared or managed space, it cannot be reverted to the default sharing configuration (access only for note owner and individual space members they share the note with). All space members with sufficient permissions will have access to the note unless it is deleted from the space.
Warning message indicating that once a note is made public, it cannot be reverted back to the default sharing configuration
-
Click Confirm.
Once a note has been made public, the access level of all space members to the note can be alternated freely between Can view and Can edit.
After a note has been made public, the management of individual user access to the note will change. For example, when you click Manage from the Share dialog, you might find that no users are listed in the menu that appears. The access level defined by the public sharing configuration of the note overrides any individual access levels that are set in the Manage dialog. The access level of a space member to the note will default to the highest access level defined in either the public share configuration or the Manage dialog. For example, if you give Can edit access to the note to all space members, you cannot downgrade a single user to Can view. You can, however, give Can view access to the note to all space members, then give Can edit access to one or more individual users. For more information about each access level available for a note, see Access levels for notes.
View notifications
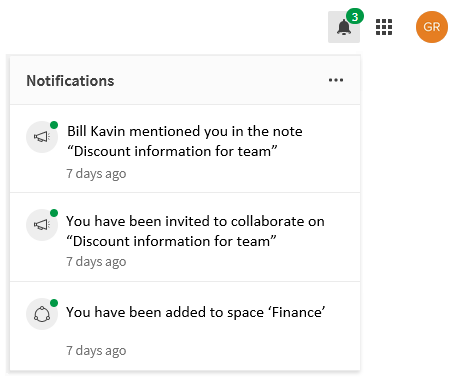
Select Notifications in the navigation bar to view events regarding notes. Select an event to navigate to the note.
You can also receive notifications by email. For information about setting notification preferences, see Notifications.
Notifications panel
Collaborate on a note
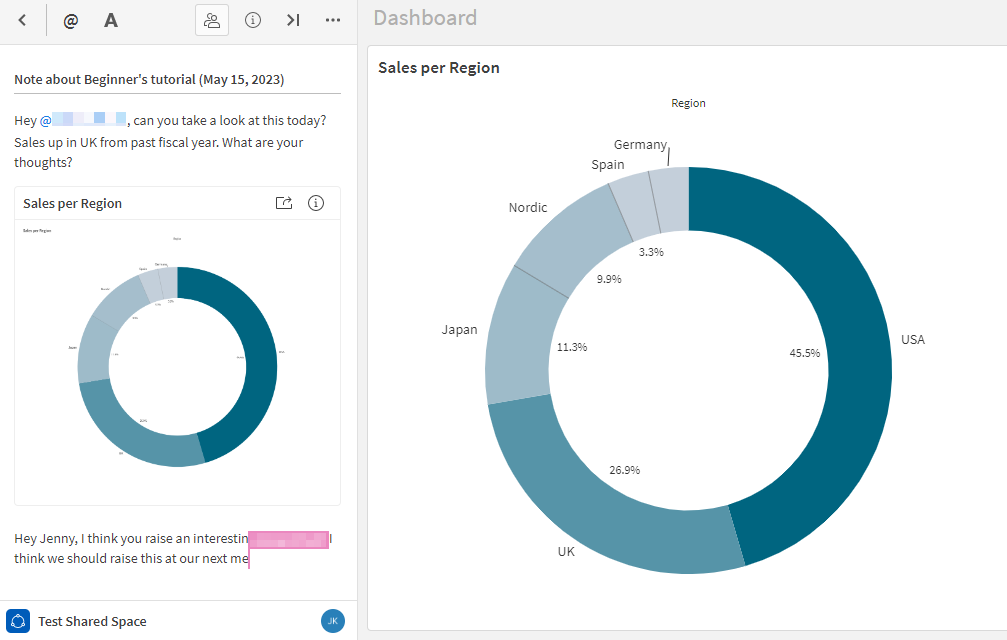
Other members of a shared or managed space with edit permissions for the note can collaborate on a note. A flag shows when someone else is active in the note.
Response in note
View notes
Open the Notes tab from the assets panel in analysis mode for a sheet. Here, you can see your notes in your personal space, as well as notes from other users in a shared or managed space.
You can also view notes in the Home and Catalog tabs, and organize notes using Collections.
View notes in Home

